In this guide we examine how to increase the disk size of a linux VM, when the need arises.
Note
Make sure you backup everything you have on your system, before trying this guide. This is an advanced HOWTO and it can break your system, irrecoverably, if you make a critical mistake!
This guide assumes that you are using the Linux Logical Volume Manager (LVM) to manage your storage. If you are new to the concept of LVM you can study the excellent LVM HOWTO from The Linux Documentation Project website.
Even though it may be possible to resize a Linux system without using LVM, an LVM setup is highly recommended. No matter if you are working on a physical or virtual machine, LVM is the preferred method of storage management in Linux, since it simplifies tasks related to storage, including volume resizing.
Another assumption is that the disk is using the legacy MBR partition table format. But the guide can easily be adapted to disks using a GPT format.
Increasing the size of the virtual disk
In this guide we are using VMware but this section can be easily adapted to different virtualization systems.
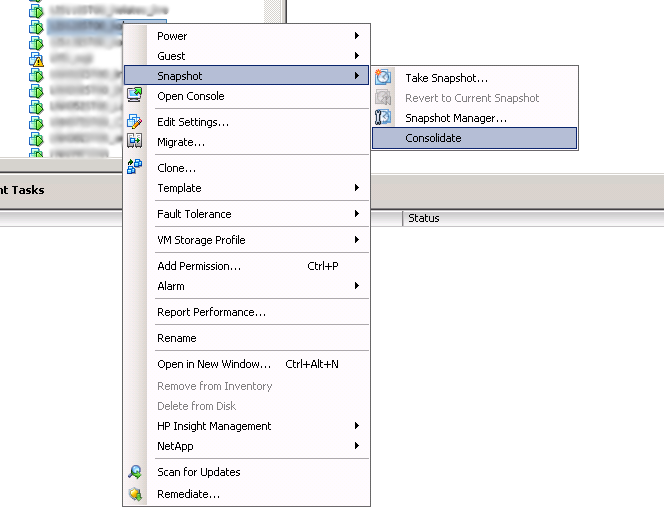
- Before increasing the disk size, it is a good idea to consolidate the snapshots of your VM. Right click and go to: <br />Snapshots -> Consolidate:
-
Press ‘OK’ when asked to do so. When the confirmation dialog appears, press ‘Yes’:

When the operation is completed (Check the ‘Recent Tasks’ pane) move to the next step.
-
Right click on the VM again and go to Edit Settings. From here, choose the disk you wish to enlarge:
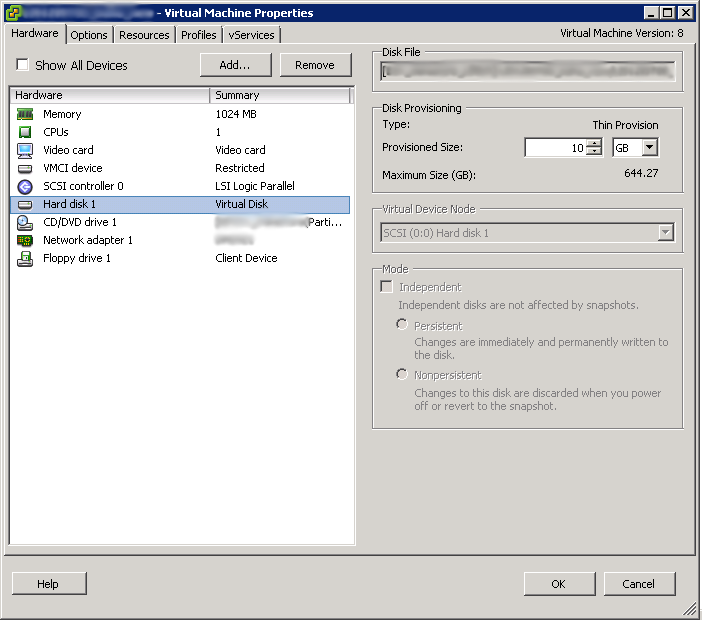
Change the size to your desired size and press OK. In my case I will change a 10G size hard disk to 65G. Press ‘OK’ when done.
Now we should move to our linux system.
Force Linux to detect the changes in the disk size
- Check the detected disk size:
# cat /proc/partitions
major minor  #blocks  name

  8        0   10485760 sda
  8        1     248832 sda1
  8        2          1 sda2
  8        5   10233856 sda5
 11        0    1048575 sr0
254        0    9760768 dm-0
254        1     471040 dm-1
As you can see the primary disk (sda) has a size of 10485760KB, which translates to 10GB:
# echo '10485760/1024/1024' | bc -l 10.00000000000000000000 - Find the SCSI subsystem buses:
# ls /sys/class/scsi_device/
0:0:0:0  2:0:0:0
0:0:0:0 is the primary bus.
Rescan for disk changes:
# echo 1 > /sys/class/scsi_device/0\:0\:0\:0/device/rescan
# cat /proc/partitions
major minor  #blocks  name

  8        0   68157440 sda
  8        1     248832 sda1
  8        2          1 sda2
  8        5   10233856 sda5
 11        0    1048575 sr0
254        0    9760768 dm-0
254        1     471040 dm-1
The size is now 65G:
# echo '68157440/1024/1024' | bc -l
65.00000000000000000000
Resize the partition used by the LVM Physical Volume (PV)
- Check which partition is used by the PV:
# pvs
 PV         VG         Fmt  Attr PSize PFree
 /dev/sda5  myvgroup   lvm2 a--  9,76g    0
So only the /dev/sda5 partition is used by LVM.
-
Backup the partition table:
# sfdisk -d /dev/sda > sda-part.mbrNow you need to save that file elsewhere because when if partition table goes down the drain, you will have no way to access the partition table backup file. You could use
scpto transfer the file on another system:# scp sda-part.mbr user@another-server:If you need to restore the partition table you can use a recovery/live cd or usb like this:
# scp user@another-server:sda-part.mbr
# sfdisk /dev/sda < sda-part.mbr
Note
You can usesgdiskfor disks with GPT tables.
Backup:sgfdisk -b sda-part.gpt /dev/sda.
Restore:sgfdisk -l sda-part.gpt /dev/sda - Resize the partition used by the PV.
-
Check the size of the partition:
# sfdisk -d /dev/sda Warning: extended partition does not start at a cylinder boundary. DOS and Linux will interpret the contents differently. # partition table of /dev/sda unit: sectors /dev/sda1 : start= 2048, size= 497664, Id=83, bootable /dev/sda2 : start= 501758, size= 20467714, Id= 5 /dev/sda3 : start= 0, size= 0, Id= 0 /dev/sda4 : start= 0, size= 0, Id= 0 /dev/sda5 : start= 501760, size= 20467712, Id=8e - Mark down the details of the sda2 and sda5 partitions in the following table:
Partition Start Sector size in KB size in Sectors sda2 501758 10233857 20467714 sda5 501760 10233856 20467712 Note
Each Sector is 512 bytes. So the number of Sectors is double the number of KBytes (1024 Bytes). The logicalsda5partition is 1KB (or 2 Sectors) smaller than the extendedsda2partition.* - Calculate the sizes of the new partitions:
The total size of the sda disk is 68157440KB which translates to 136314880 Sectors. So the new size (in Sectors) of sda2 would be:
# echo 136314880-501758 | bc -l
135813122
The size, in sectors, of sda5 would be:
# echo 136314880-501760 | bc -l
135813120
According to the calculations above, the new table with the partition details would be:
Partition Start Sector size in KB size in Sectors sda2 501758 67906561 135813122 sda5 501760 67906560 135813120 - Resize the sda2 (extended) and sda5 partitions.
Copy the sda-part.mbr file to sda-part-new.mbr and make the following changes to sda-part-new.mbr:
# partition table of /dev/sda
unit: sectors
/dev/sda1 : start=     2048, size=    497664, Id=83, bootable
/dev/sda2 : start=   501758, size= 135813122, Id= 5
/dev/sda3 : start=        0, size=         0, Id= 0
/dev/sda4 : start=        0, size=         0, Id= 0
/dev/sda5 : start=   501760, size= 135813120, Id=8e
Now apply these changes to the MBR using sfdisk:
# sfdisk --no-reread /dev/sda < sda-part-new.mbrIgnore any warnings for now.
-
Verify the new partition table:
# sfdisk -d /dev/sda
Warning: extended partition does not start at a cylinder boundary.
DOS and Linux will interpret the contents differently.
# partition table of /dev/sda
unit: sectors

/dev/sda1 : start=     2048, size=   497664, Id=83, bootable
/dev/sda2 : start=   501758, size=135813122, Id= 5
/dev/sda3 : start=        0, size=        0, Id= 0
/dev/sda4 : start=        0, size=        0, Id= 0
/dev/sda5 : start=   501760, size=135813120, Id=8e
It looks correct.
-
Verify that the linux kernel has been notified of the changes:
# cat /proc/partitions
major minor  #blocks  name

   8        0   68157440 sda
   8        1     248832 sda1
   8        2          1 sda2
   8        5   10233856 sda5
  11        0    1048575 sr0
 254        0    9760768 dm-0
 254        1     471040 dm-1
It looks like the system still sees the old partition size. You could use a utility like partprobre, kpartx or even sfdisk to force the kernel to re-read the new partition table:
# sfdisk -R /dev/sda
BLKRRPART: Device or resource busy
This disk is currently in use.
Alas if the partition is in use, the kernel will refuse to re-read the partition size. In that case just schedule a reboot and try again.
After the system reboot:
# cat /proc/partitions
major minor  #blocks  name

   8        0   68157440 sda
   8        1     248832 sda1
   8        2          1 sda2
   8        5   67906560 sda5
  11        0    1048575 sr0
 254        0    9760768 dm-0
 254        1     471040 dm-1
So the new size of the sda5 partition is 64,76GB:
# echo '67906560/1024/1024' | bc -l
64.76074218750000000000
If the partition size has increased, we can move on to the next step.
Resize the Physical Volume (PV).
-
Check the size of the Physical Volume:
# pvs
 PV         VG        Fmt  Attr PSize PFree
 /dev/sda5  ubuntu-vg lvm2 a--  9,76g    0
So the size of the PV is still 9,76GB.
-
Resize the PV:
# pvresize /dev/sda5 Physical volume "/dev/sda5" changed 1 physical volume(s) resized / 0 physical volume(s) not resized - Verify that the size is resized:
# pvs
 PV         VG        Fmt  Attr PSize  PFree
 /dev/sda5  ubuntu-vg lvm2 a--  64,76g 55,00g
So the new size of the PV is 64,8GB.
Resize the logical volume.
-
Check the current size of the logical volume (used for the root filesystem):
# lvs
 LV     VG        Attr     LSize   Pool Origin Data%  Move Log Copy%  Convert
 root   ubuntu-vg -wi-ao--   9,31g
 swap_1 ubuntu-vg -wi-ao-- 460,00m
The root volume is still at 9,3GB.
-
Check the free space:
# vgs VG #PV #LV #SN Attr VSize VFree ubuntu-vg 1 2 0 wz--n- 64,76g 55,00g - Resize the root logical volume:
# lvresize -L +55,00g /dev/mapper/ubuntu-vg-root Extending logical volume root to 64,31 GiB Logical volume root successfully resized - Verify LV resize:
# lvs
LV     VG        Attr     LSize   Pool Origin Data%  Move Log Copy%  Convert
root   ubuntu-vg -wi-ao--  64,31g
swap_1 ubuntu-vg -wi-ao-- 460,00m
The root logical volume size is now at 65,3GB
Resize the root filesystem.
-
Check the current size of the root filesystem:
# df -hT
Filesystem                  Type      Size  Used Avail Use% Mounted on
rootfs                      rootfs    9,2G  2,2G  6,6G  25% /
udev                        devtmpfs   10M     0   10M   0% /dev
tmpfs                       tmpfs     101M  204K  101M   1% /run
/dev/mapper/ubuntu-vg-root  ext4      9,2G  2,2G  6,6G  25% /
tmpfs                       tmpfs     5,0M     0  5,0M   0% /run/lock
tmpfs                       tmpfs     201M     0  201M   0% /run/shm
/dev/sda1                   ext2      228M   18M  199M   9% /boot
So the root filesystem is still at 9,2GB.
-
Resize the file system:
# resize2fs /dev/mapper/ubuntu-vg-root resize2fs 1.42.5 (29-Jul-2012) Filesystem at /dev/mapper/ubuntu-vg-root is mounted on /; on-line resizing required old_desc_blocks = 1, new_desc_blocks = 5 Performing an on-line resize of /dev/mapper/ubuntu-vg-root to 16858112 (4k) blocks. The filesystem on /dev/mapper/ubuntu-vg-root is now 16858112 blocks long. - Verify that the filesystem has been resized:
# df -hT
Filesystem                  Type      Size  Used Avail Use% Mounted on
rootfs                      rootfs     64G  2,2G   58G   4% /
udev                        devtmpfs   10M     0   10M   0% /dev
tmpfs                       tmpfs     101M  204K  101M   1% /run
/dev/mapper/ubuntu-vg-root  ext4       64G  2,2G   58G   4% /
tmpfs                       tmpfs     5,0M     0  5,0M   0% /run/lock
tmpfs                       tmpfs     201M     0  201M   0% /run/shm
/dev/sda1                   ext2      228M   18M  199M   9% /boot
So now you have 55GB of additional storage on your root partition, to satisfy your increasing storage needs.
References
- https://ma.ttias.be/increase-a-vmware-disk-size-vmdk-formatted-as-linux-lvm-without-rebooting/
- http://gumptravels.blogspot.com/2009/05/using-sfdisk-to-backup-and-restore.html
- http://askubuntu.com/questions/57908/how-can-i-quickly-copy-a-gpt-partition-scheme-from-one-hard-drive-to-another