Categories
Linux

Introduction to the KVM Hypervisor (for Ubuntu)

The KVM hypervisor is a virtualization system included with the Linux kernel. Along with XEN is one of the most attractive virtualization platforms based on Linux.

KVM offers several advantages over the more user-friendly, VirtualBox. Since it is integrated into the mainstream Linux kernel, it boasts significant performance benefits [1]. Furthermore it is better suited as a virtualization platform solution while VirtualBox is better suited for short-term tests and casual, user owned, VMs. KVM supports many guest operating systems so you can use Linux, Unix, Windows or something more exotic.

Install KVM on your system

  1. Make sure your system supports KVM.

    KVM is only supported on systems with Hardware-Assisted Virtualization. If your system does not support HAV you can revert to QEMU, a system which KVM is based on.

  • First install CPU checker:

    $ sudo apt-get -y install cpu-checker
    

  • Check if KVM is supported:
    $ kvm-ok
    INFO: /dev/kvm exists
    KVM acceleration can be used
    

    Looks OK. Still you may need to check your BIOS/EFI whether this feature is enabled.

  1. Install KVM:

    $ sudo apt-get -y install qemu-kvm
    

KVM Basic Usage

You can use KVM directly. This method is suitable for testing or troubleshooting but not appropriate for production VMs.

  1. Create a disk image:
    $ qemu-img create -f qcow2 testvm.qcow2 20G
    Formatting 'testvm.qcow2', fmt=qcow2 size=21474836480 encryption=off cluster_size=65536 lazy_refcounts=off
    

    The qcow2 format grows dynamically so it does not really occupy 20GB:

    $ ls -lh testvm.qcow2 
    -rw-r--r-- 1 theo theo   193K Μάι  14 18:43 testvm.qcow2
    
  2. Start a VM instance, to setup your system:
    $ kvm -m 1024 -hda testvm.qcow2 -cdrom ~/Downloads/ubuntu-15.04-desktop-amd64.iso -boot d -smp 2
    

    The options are explained below:

    • -m: memory in MB
    • -hda: first disk image to use
    • -cdrom: you can use an .iso file (ubuntu-15.04-desktop-amd64.iso) or a physical CD-ROM (/dev/sr0).
    • -boot: choose where to boot from. A parameter of d tells KVM to use the cdrom for booting.
    • -smp: Stands for Symmetric Multiprocessing. 2 is the number of CPUs available to the VM.

    After you run the command above you will get a window with your VM running in it:

    KVM VM

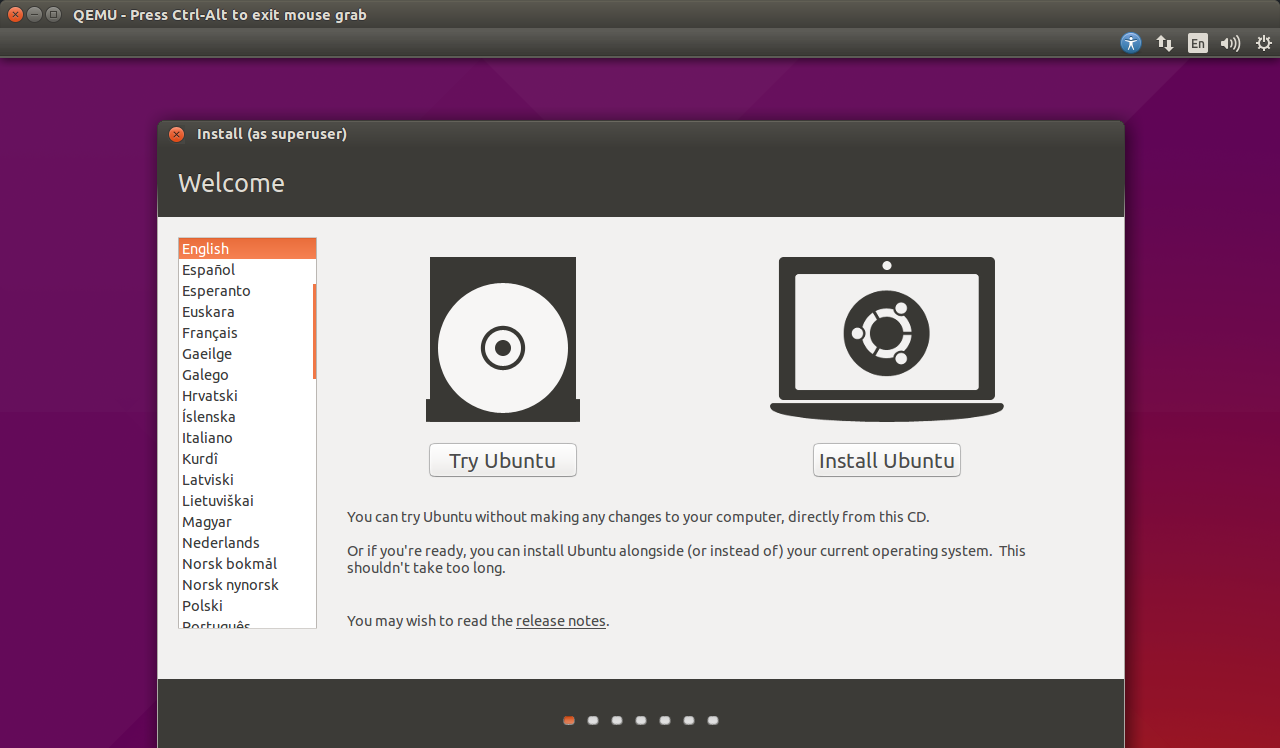
    This window will capture your mouse and keyboard when you work in it. If you want to return to your host OS just press Ctrl-Alt together and they will both be released.

  3. Run your VM.

    After the installation is finished you can run your VM from the disk image.

    • First let’s check the size of your disk:
      $ ls -lh testvm.qcow2
      -rw-r--r-- 1 theodotos theodotos 5,9G Μάι  14 19:33 testvm.qcow2
      

    So after the installation of Ubuntu Desktop 15.04 (Vivid Vervet) the disk image has grown to 5.9GB.

    • Run the VM from the disk image:
      $ kvm -m 1024 -hda testvm.qcow2 -smp 2
      

    A new window will pop up with the freshly installed OS.

Running KVM under libvirt

The libvirt system, is a platform for running VMs under many different hypervisors using a common API and toolset. It supports KVM, XEN, QEMU, VirtualBox and many others. This is the preferred method of using KVM because the VMs are globally available to privileged (local and remote) users, it facilitates VM management and you can configure autostart and many other features.

  1. Setting up libvirt:
    $ sudo apt-get -y install libvirt-bin
    
  2. Give appropriate permissions to the users expected to manage your VMs:
    $ sudo usermod -a -G libvirtd theo
    

    The theo user will be added as a member in the libvirtd group. After that you will need to log-out, for the permission to be activated.

Creating a libvirt ready VM

There are many tools to create VMs for libvirt. In this section we are going to examine two of them: virt-install and uvtool.

  1. Using virt-install.

    The advantage of virt-install is being distro agnostic. That means you can use it to install Debian, Ubuntu, RHEL, CentOS, Fedora, SUSE and many other distros as well.

    • Install virt-install:
      $ sudo apt-get -y install virtinst
      
    • Create a machine:
      $ sudo virt-install -n testvm -r 512 --disk path=/var/lib/libvirt/images/testvm.img,bus=virtio,size=4 -c ~/Downloads/ubuntu-14.04.2-server-amd64.iso --network network=default,model=virtio --graphics vnc,listen=127.0.0.1 --noautoconsole -v
      
      Starting install...
      Allocating 'testvm.img'                     | 4.0 GB     00:00     
      Creating domain...                          |    0 B     00:01     
      Domain installation still in progress.  You can reconnect to 
      the console to complete the installation process.
      
      • -n: VM name
      • -r: RAM in MB
      • –disk: Path for the virtual disk.
      • -c: defive the .iso file or CDROM device to use for the OS installation.
      • –network: Select your preferred networking mode.
      • –graphics: Select the graphics protocol. We are using VNC here that allows connections only from localhost. You can use the 0.0.0.0 (any) instead if 127.0.0.1 IP to allow connections from elsewhere.
      • –noautoconsole: do not run the guest console.
  • Connect to the VM and setup the guest OS:
    $ xtightvncviewer 127.0.0.1
    

    The VNC client will connect to the default VNC port which is 5900. You can append ::<port> to the hostname or IP address if you want to use a different port, e.g. xtightvncviewer 127.0.0.1::5901

    NOTE: If xtightvncviewer is not installed you can install it with sudo apt-get install xtightvncviewer. You can also use a graphical VNC client like Remmina.

  • Verify that the machine is created:

     $ virsh list --all
      Id    Name                           State
       ----------------------------------------------------
       -     testvm                         shut off
    

    The machine will appear as shut off after the OS setup finishes.

  • Start the VM:

    $ virsh start testvm
      Domain testvm started
    

  • Verify that the VM is started:
    $ virsh list
    Id    Name                         State
    ----------------------------------------
    3     testvm                     running
    
    1. Install a VM using uvtool:

      The uvtool is a tool to create minimal VMs. Unlike virt-install you can create only Ubuntu VMs but the overall setup is taken care by uvtool.

      • Install uvtool:
        $ sudo apt-get -y install uvtool uvtool-libvirt
        
      • Create a local repository of ubuntu-cloud images:
        $ uvt-simplestreams-libvirt sync release=trusty arch=amd64
        

      This command will download the trusty (14.04) release locally.

      • Query for local repository
        $ uvt-simplestreams-libvirt query
        release=trusty arch=amd64 label=release (20150506)
        
      • Generate an ssh key pair (unless you already have one):
        $ ssh-keygen -b 4096
        
      • Create a uvt based VM:
        $ uvt-kvm create --cpu 2 --memory=1024 --disk=10 testuvt
        

      This will create a trusty VM with 2 CPUs, 1GB RAM and 10 GB disk.

    • Verify the machine creation:

      $ virsh list
       Id    Name                           State
        ----------------------------------------------------
         5     testuvt                        running
      

    • Connect to your VM:

      $ uvt-kvm ssh testuvt --insecure

      You can get root access, on the VM, with sudo -i.

    Managing libvirt using the graphical Virtual Machine Manager

    Virtual Machine Manager is a front-end to libvirt. It help system administrators managing their VMs using a convenient graphical interface.

    1. Installing Virtual Machine Manager:
      $ sudo apt-get -y install virt-manager
      
    2. Running Virtual Machine Manager:
    • You can find it in the application menu or run virt-manager from the command line.
      virt-manager-1.png

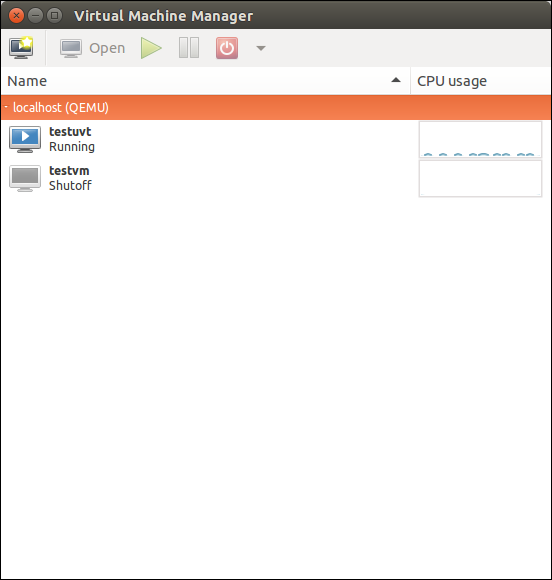
      As you can see the two VMs we created earlier, are already there.

    1. Creating a new machine.

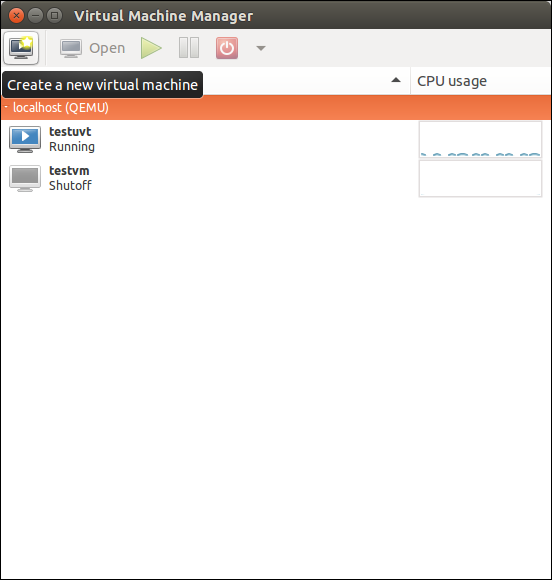
      • Press the Create a new machine icon:
        virt-manager-2.png
    2. New VM options.
    • Select one of the following option to continue:
      virt-manager-3.png
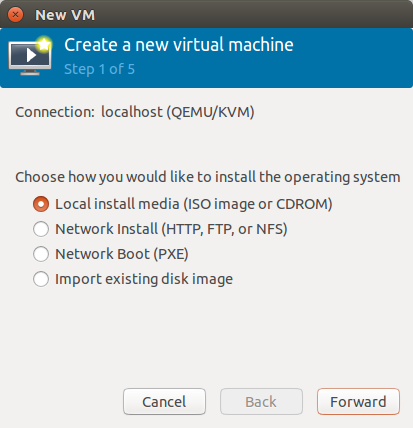
      Each option provides different steps. You may need to read the documentation for all the details. The first option is the most straight forward.

    Managing your VMs with virsh

    1. Listing machines.
    • List only running machines:

      $ virsh list
       Id    Name                           State
        ----------------------------------------------------
         5     testuvt                        running
      

    • List all machines:
      $ virsh list --all
       Id    Name                           State
        ----------------------------------------------------
         5     testuvt                        running
         -     testvm                         shut off
      
    1. Starting machines:
      $ virsh start testvm
      Domain testvm started
      
    2. Shutdown machines:
      $ virsh shutdown testvm
      Domain testvm is being shutdown
      
    3. Restart machines:
      $ virsh reboot testuvt
      Domain testuvt is being rebooted
      
    4. Set machines to autostart:
      • Enable autostart:
        $ virsh autostart testuvt
        Domain testuvt marked as autostarted
        
      • Disable autostart
        $ virsh autostart --disable testuvt
        Domain testuvt unmarked as autostarted
        
    5. Other useful virsh commands:
      • console: get console access to a VM.
      • destroy: destroy (delete) a machine.
      • dominfo: get the machine details.
      • migrate: migrate a machine to another libvirt host.
      • save: save the machine state.
      • snapshot-create: create a snapshot of the machine.

      To see all the supported commands you can run virsh --help.

    Learning to use libvirt is of great value to a Linux sysadmin because the same commands apply for KVM, XEN, VirtualBox, even container systems like OpenVZ and LXC.

    References

    • [1] http://www.phoronix.com/scan.php?page=article&item=ubuntu_1404_kvmbox&num=5
    • [2] https://help.ubuntu.com/14.04/serverguide/virtualization.html
    • [3] https://help.ubuntu.com/community/KVM</port>
    Categories
    Linux

    Increasing the disk size of a Linux VM

    In this guide we examine how to increase the disk size of a linux VM, when the need arises.

    Note
    Make sure you backup everything you have on your system, before trying this guide. This is an advanced HOWTO and it can break your system, irrecoverably, if you make a critical mistake!

    This guide assumes that you are using the Linux Logical Volume Manager (LVM) to manage your storage. If you are new to the concept of LVM you can study the excellent LVM HOWTO from The Linux Documentation Project website.

    Even though it may be possible to resize a Linux system without using LVM, an LVM setup is highly recommended. No matter if you are working on a physical or virtual machine, LVM is the preferred method of storage management in Linux, since it simplifies tasks related to storage, including volume resizing.

    Another assumption is that the disk is using the legacy MBR partition table format. But the guide can easily be adapted to disks using a GPT format.

    Increasing the size of the virtual disk

    In this guide we are using VMware but this section can be easily adapted to different virtualization systems.

    1. Before increasing the disk size, it is a good idea to consolidate the snapshots of your VM. Right click and go to: <br />Snapshots -> Consolidate:

      Consolidate Snapshots

    • Press ‘OK’ when asked to do so. When the confirmation dialog appears, press ‘Yes’:

      Confirm Consolidate
      When the operation is completed (Check the ‘Recent Tasks’ pane) move to the next step.

    1. Right click on the VM again and go to Edit Settings. From here, choose the disk you wish to enlarge:

      Enlarge Disk
      Change the size to your desired size and press OK. In my case I will change a 10G size hard disk to 65G. Press ‘OK’ when done.

    Now we should move to our linux system.

    Force Linux to detect the changes in the disk size

    1. Check the detected disk size:
      # cat /proc/partitions
      major minor  #blocks  name
      
        8        0   10485760 sda
        8        1     248832 sda1
        8        2          1 sda2
        8        5   10233856 sda5
       11        0    1048575 sr0
      254        0    9760768 dm-0
      254        1     471040 dm-1
      

      As you can see the primary disk (sda) has a size of 10485760KB, which translates to 10GB:

      # echo '10485760/1024/1024' | bc -l
      10.00000000000000000000
      
    2. Find the SCSI subsystem buses:
      # ls /sys/class/scsi_device/
      0:0:0:0  2:0:0:0
      

      0:0:0:0 is the primary bus.

  • Rescan for disk changes:

    # echo 1 > /sys/class/scsi_device/0\:0\:0\:0/device/rescan
    

  • Check the new size:
    # cat /proc/partitions
    major minor  #blocks  name
    
      8        0   68157440 sda
      8        1     248832 sda1
      8        2          1 sda2
      8        5   10233856 sda5
     11        0    1048575 sr0
    254        0    9760768 dm-0
    254        1     471040 dm-1
    

    The size is now 65G:

    # echo '68157440/1024/1024' | bc -l
    65.00000000000000000000
    
  • Resize the partition used by the LVM Physical Volume (PV)

    1. Check which partition is used by the PV:
      # pvs
       PV         VG         Fmt  Attr PSize PFree
       /dev/sda5  myvgroup   lvm2 a--  9,76g    0
      

      So only the /dev/sda5 partition is used by LVM.

    2. Backup the partition table:

      # sfdisk -d /dev/sda > sda-part.mbr
      

      Now you need to save that file elsewhere because when if partition table goes down the drain, you will have no way to access the partition table backup file. You could use scp to transfer the file on another system:

      # scp sda-part.mbr user@another-server:
      

      If you need to restore the partition table you can use a recovery/live cd or usb like this:

      # scp user@another-server:sda-part.mbr
      # sfdisk /dev/sda < sda-part.mbr
      

      Note
      You can use sgdisk for disks with GPT tables.
      Backup:
      sgfdisk -b sda-part.gpt /dev/sda.
      Restore: sgfdisk -l sda-part.gpt /dev/sda

    3. Resize the partition used by the PV.
    • Check the size of the partition:

      # sfdisk -d /dev/sda
      Warning: extended partition does not start at a cylinder boundary.
      DOS and Linux will interpret the contents differently.
      # partition table of /dev/sda
      unit: sectors
      
      /dev/sda1 : start=     2048, size=   497664, Id=83, bootable
      /dev/sda2 : start=   501758, size= 20467714, Id= 5
      /dev/sda3 : start=        0, size=        0, Id= 0
      /dev/sda4 : start=        0, size=        0, Id= 0
      /dev/sda5 : start=   501760, size= 20467712, Id=8e
      

    • Mark down the details of the sda2 and sda5 partitions in the following table:
      Partition Start Sector size in KB size in Sectors
      sda2 501758 10233857 20467714
      sda5 501760 10233856 20467712

      Note
      Each Sector is 512 bytes. So the number of Sectors is double the number of KBytes (1024 Bytes). The logical sda5 partition is 1KB (or 2 Sectors) smaller than the extended sda2 partition.*

    • Calculate the sizes of the new partitions:

      The total size of the sda disk is 68157440KB which translates to 136314880 Sectors. So the new size (in Sectors) of sda2 would be:

      # echo 136314880-501758 | bc -l
      135813122
      

      The size, in sectors, of sda5 would be:

      # echo 136314880-501760 | bc -l
      135813120
      

      According to the calculations above, the new table with the partition details would be:

      Partition Start Sector size in KB size in Sectors
      sda2 501758 67906561 135813122
      sda5 501760 67906560 135813120
    • Resize the sda2 (extended) and sda5 partitions.

      Copy the sda-part.mbr file to sda-part-new.mbr and make the following changes to sda-part-new.mbr:

      # partition table of /dev/sda
      unit: sectors
      /dev/sda1 : start=     2048, size=    497664, Id=83, bootable
      /dev/sda2 : start=   501758, size= 135813122, Id= 5
      /dev/sda3 : start=        0, size=         0, Id= 0
      /dev/sda4 : start=        0, size=         0, Id= 0
      /dev/sda5 : start=   501760, size= 135813120, Id=8e
      

      Now apply these changes to the MBR using sfdisk:

      # sfdisk --no-reread /dev/sda < sda-part-new.mbr
      

      Ignore any warnings for now.

    • Verify the new partition table:

      # sfdisk -d /dev/sda
      Warning: extended partition does not start at a cylinder boundary.
      DOS and Linux will interpret the contents differently.
      # partition table of /dev/sda
      unit: sectors
      
      /dev/sda1 : start=     2048, size=   497664, Id=83, bootable
      /dev/sda2 : start=   501758, size=135813122, Id= 5
      /dev/sda3 : start=        0, size=        0, Id= 0
      /dev/sda4 : start=        0, size=        0, Id= 0
      /dev/sda5 : start=   501760, size=135813120, Id=8e
      

      It looks correct.

    • Verify that the linux kernel has been notified of the changes:

      # cat /proc/partitions 
      major minor  #blocks  name
      
         8        0   68157440 sda
         8        1     248832 sda1
         8        2          1 sda2
         8        5   10233856 sda5
        11        0    1048575 sr0
       254        0    9760768 dm-0
       254        1     471040 dm-1
      

      It looks like the system still sees the old partition size. You could use a utility like partprobre, kpartx or even sfdisk to force the kernel to re-read the new partition table:

      # sfdisk -R /dev/sda
      BLKRRPART: Device or resource busy
      This disk is currently in use.
      

      Alas if the partition is in use, the kernel will refuse to re-read the partition size. In that case just schedule a reboot and try again.

      After the system reboot:

      # cat /proc/partitions
      major minor  #blocks  name
      
         8        0   68157440 sda
         8        1     248832 sda1
         8        2          1 sda2
         8        5   67906560 sda5
        11        0    1048575 sr0
       254        0    9760768 dm-0
       254        1     471040 dm-1
      

      So the new size of the sda5 partition is 64,76GB:

      # echo '67906560/1024/1024' | bc -l
      64.76074218750000000000
      

      If the partition size has increased, we can move on to the next step.

    Resize the Physical Volume (PV).

    1. Check the size of the Physical Volume:

      # pvs
       PV         VG        Fmt  Attr PSize PFree
       /dev/sda5  ubuntu-vg lvm2 a--  9,76g    0 
      

      So the size of the PV is still 9,76GB.

    2. Resize the PV:

      # pvresize /dev/sda5
       Physical volume "/dev/sda5" changed
       1 physical volume(s) resized / 0 physical volume(s) not resized
      

    3. Verify that the size is resized:
      # pvs
       PV         VG        Fmt  Attr PSize  PFree 
       /dev/sda5  ubuntu-vg lvm2 a--  64,76g 55,00g
      

      So the new size of the PV is 64,8GB.

    Resize the logical volume.

    1. Check the current size of the logical volume (used for the root filesystem):

      # lvs
       LV     VG        Attr     LSize   Pool Origin Data%  Move Log Copy%  Convert
       root   ubuntu-vg -wi-ao--   9,31g
       swap_1 ubuntu-vg -wi-ao-- 460,00m
      

      The root volume is still at 9,3GB.

    2. Check the free space:

      # vgs
       VG        #PV #LV #SN Attr   VSize  VFree 
       ubuntu-vg   1   2   0 wz--n- 64,76g 55,00g
      

    3. Resize the root logical volume:
      # lvresize -L +55,00g /dev/mapper/ubuntu-vg-root
       Extending logical volume root to 64,31 GiB
       Logical volume root successfully resized
      
    4. Verify LV resize:
      # lvs
      LV     VG        Attr     LSize   Pool Origin Data%  Move Log Copy%  Convert
      root   ubuntu-vg -wi-ao--  64,31g
      swap_1 ubuntu-vg -wi-ao-- 460,00m
      

      The root logical volume size is now at 65,3GB

    Resize the root filesystem.

    1. Check the current size of the root filesystem:

      # df -hT
      Filesystem                  Type      Size  Used Avail Use% Mounted on
      rootfs                      rootfs    9,2G  2,2G  6,6G  25% /
      udev                        devtmpfs   10M     0   10M   0% /dev
      tmpfs                       tmpfs     101M  204K  101M   1% /run
      /dev/mapper/ubuntu-vg-root  ext4      9,2G  2,2G  6,6G  25% /
      tmpfs                       tmpfs     5,0M     0  5,0M   0% /run/lock
      tmpfs                       tmpfs     201M     0  201M   0% /run/shm
      /dev/sda1                   ext2      228M   18M  199M   9% /boot
      

      So the root filesystem is still at 9,2GB.

    2. Resize the file system:

      # resize2fs /dev/mapper/ubuntu-vg-root
      resize2fs 1.42.5 (29-Jul-2012)
      Filesystem at /dev/mapper/ubuntu-vg-root is mounted on /; on-line resizing required
      old_desc_blocks = 1, new_desc_blocks = 5
      Performing an on-line resize of /dev/mapper/ubuntu-vg-root to 16858112 (4k) blocks.
      The filesystem on /dev/mapper/ubuntu-vg-root is now 16858112 blocks long.
      

    3. Verify that the filesystem has been resized:
      # df -hT
      Filesystem                  Type      Size  Used Avail Use% Mounted on
      rootfs                      rootfs     64G  2,2G   58G   4% /
      udev                        devtmpfs   10M     0   10M   0% /dev
      tmpfs                       tmpfs     101M  204K  101M   1% /run
      /dev/mapper/ubuntu-vg-root  ext4       64G  2,2G   58G   4% /
      tmpfs                       tmpfs     5,0M     0  5,0M   0% /run/lock
      tmpfs                       tmpfs     201M     0  201M   0% /run/shm
      /dev/sda1                   ext2      228M   18M  199M   9% /boot
      

    So now you have 55GB of additional storage on your root partition, to satisfy your increasing storage needs.

    References

    • https://ma.ttias.be/increase-a-vmware-disk-size-vmdk-formatted-as-linux-lvm-without-rebooting/
    • http://gumptravels.blogspot.com/2009/05/using-sfdisk-to-backup-and-restore.html
    • http://askubuntu.com/questions/57908/how-can-i-quickly-copy-a-gpt-partition-scheme-from-one-hard-drive-to-another